Want to add colorful, long-lasting designs to cups and mugs — without using a heat press? UV DTF cup wraps make it easy. They let you transfer full-color graphics onto smooth surfaces with just a peel and stick.
In this guide, you’ll learn how to make UV DTF cup wraps step-by-step, what tools you need, and tips to get a perfect result every time. Let’s jump in! 🚀
📌 What You’ll Learn
- What materials and tools are needed
- How the printing and transfer process works
- Easy tips for better results
- Mistakes to avoid
🧾 Tools and Materials You Need
Before you start, make sure you have these:
📌 UV DTF Printer – Prints your design onto film
📌 A Film + B Film – Special sheets for printing and transfer
Film A (Base Printing Film): The bottom carrier sheet equipped with a pressure-sensitive cold adhesive coat. This is the primary film where White, CMYK, and Varnish inks are printed.
Film B (Transfer Carrier Film): A transparent positioning tape laminated onto Film A. It lifts the printed pattern off Film A so you can transfer it onto your cups with pinpoint accuracy.
📌 UV DTF Inks – Colorful inks that cure under UV light
UV DTF Inks + Varnish: High-viscosity UV-curable inks that cure instantly under light. The clear Varnish (Gloss Coat) creates a glossy 3D texture, seals the color, and makes the wrap waterproof and scratch-resistant.
📌 Laminator (optional) – Helps press the two films together
📌 Application tools – Like a squeegee or soft cloth
👉 Tip: Winnerjet’s UV DTF ink and films are great for cup wraps — bright colors, smooth application, and strong adhesion to curved surfaces.
📏 UV DTF Cup Wrap Sizing & Template Dimensions Guide
One of the most common mistakes beginners make is creating designs that don’t fit their drinkware. Before opening your graphic software, check the standard wrap dimensions below or measure your cup manually.
1. Standard Cup Wrap Size Chart
Here are the industry-standard design template sizes for popular drinkware:
16 oz Glass Can (Libbey style): 9.4″ x 4.3″ (23.8 cm x 11.0 cm)
20 oz Glass Can (Large): 9.8″ x 5.0″ (24.9 cm x 12.7 cm)
20 oz Skinny Straight Tumbler: 9.3″ x 8.2″ (23.6 cm x 20.8 cm)
11 oz Ceramic Mug: 8.5″ x 3.75″ (21.6 cm x 9.5 cm)
2. How to Measure Your Cup for a Perfect Fit
If you are using a custom or non-standard cup, follow these 3 quick steps to get exact measurements:
Measure the Circumference (Width): Wrap a flexible measuring tape around the body of the cup. Add 0.1″ to 0.2″ (2–5 mm) to your total width if you want a seamless overlap, or leave a 0.2″ gap if you prefer a non-overlapping back seam.
Measure the Height: Measure from just above the base to right below the top rim curve. Leave about 0.25″ (6 mm) of clearance at the top and bottom edge to prevent lifting over time.
Account for Taper (Curved Cups): If your tumbler narrows toward the bottom, use a soft arch design instead of a plain rectangle so the wrap lays flat without buckling.
🔧 Step-by-Step: How to Make UV DTF Cup Wraps
Want to see the entire printing and transfer process in action before you start? Watch our quick step-by-step video tutorial below:
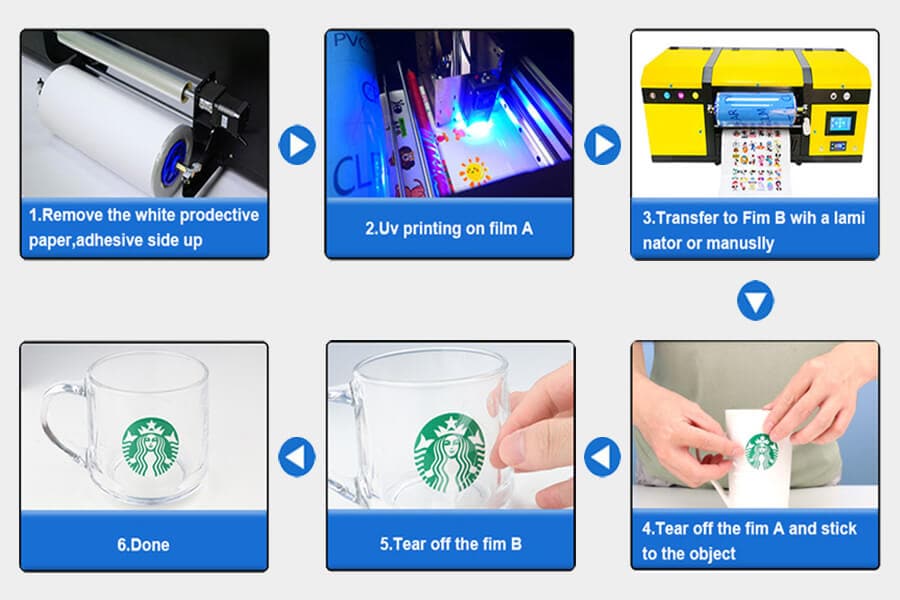
1️⃣ Create Your Design
Use software like Photoshop or Canva to design your cup wrap. Make sure the size fits your cup.
✅ If your cup is curved, make the top and bottom edges of your design slightly arched so it wraps better.
2️⃣ Print on A Film
Print your design on the matte side of the A film using your UV DTF printer.
The printer will add white, color, and a shiny top layer (called varnish).
⚠️ Don’t flip the image — print it just like you see it.
3️⃣ Apply the B Film
Place the sticky B film over the printed A film.
Use a roller or laminator to press them together gently. Wait a few minutes before using.
🧼 Make sure there’s no dust or bubbles between the films.
4️⃣ Stick the Design on Your Cup
Cut your design to the right size.
Peel off the backing of the A film and stick the design onto a clean, dry cup.
Use your fingers or a cloth to press it down.
🎥 Pro Tip Demonstration (from 10:50 in video)
📣 You don’t need heat — just pressure.
5️⃣ Peel Off the B Film
Gently peel away the top B film. Your design will stay on the cup — smooth and shiny.
💡 Wait a few seconds before peeling for a stronger bond.
🚫 Avoid These Common Mistakes
- ❌ Printing on the wrong side of the film
- ❌ Using cheap inks or the wrong printer settings
- ❌ Not pressing the wrap down fully
- ❌ Applying it to a dirty or wet cup
🏆 Why Choose Winnerjet for Cup Wrap Supplies?
✔ Bright, long-lasting UV DTF inks that don’t fade
✔ Easy-peel A/B films with a strong grip and no bubbles
✔ Reliable supply for printers and studios around the world
📌 Winnerjet products are perfect for businesses that want to offer personalized cups, mugs, and drinkware with a professional finish.
📣 Final Tips & Action Steps
✨ Keep these tips in mind for best results:
- Make sure the cup is clean and dry
- Use quality ink and film for better sticking
- Store your finished wraps in a dust-free space
Ready to get started?
👉 Request a Free Sample from Winnerjet
👉 Get a Custom Quote for Your Cup Projects
🧠 FAQs
Do I need a heat press for UV DTF wraps?
No — just press the design onto the cup by hand.
Can I use any printer?
You’ll need a UV flatbed printer that supports white ink and varnish layers.
Are these wraps waterproof?
Yes, they hold up well with normal use and washing (avoid dishwashers).
Can I put the design where people drink from?
It’s best to keep the design below the rim, just to be safe.
Can I sell these cups online?
Absolutely — many small businesses use UV DTF for custom drinkware.