Want to create colorful, long-lasting stickers that stick to almost anything?
UV DTF transfers are the answer—and you don’t need fancy equipment to get started. In this guide, you’ll learn how to make UV DTF transfers at home using simple tools and clear steps.
🧰 What You’ll Need
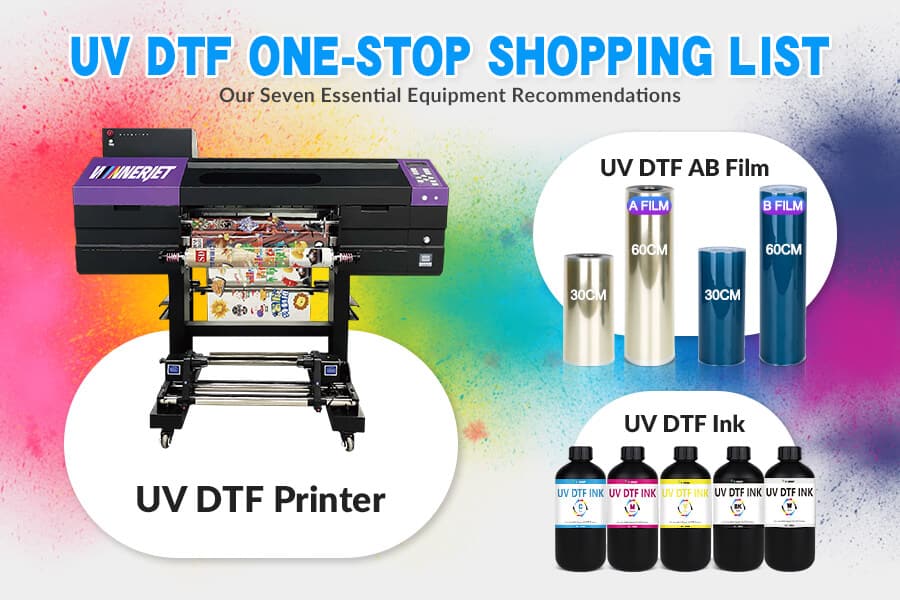
Before you begin, get these supplies ready:
✅ A UV DTF printer (or access to one)
✅ A/B UV DTF film sheets (the printing and transfer layers)
✅ UV DTF ink (that works with your printer)
✅ UV lamp or curing light
✅ A squeegee or roller
✅ Scissors or a cutting machine
💡Tip: Make sure your workspace is clean and dust-free!
🪜 Step-by-Step: How to Make UV DTF Transfers
Step 1: Layout & RIP Software Setup
Design your layout in Illustrator or Photoshop to optimize film space. Import into RIP software (e.g., MainTop or FlexiPrint) to configure spot layers: CMYK (colors), White Ink (opaque base), and Gloss Varnish (3D protective finish).
Step 2: 3-in-1 Pass UV Printing
Load UV DTF A Film (sticky side up) into a roll-to-roll UV printer. The print heads simultaneously deposit White, CMYK, and Gloss Varnish in a single pass, cured instantly by built-in UV LED lamps.
Step 3: Automatic Film Lamination
Directly after printing, the machine’s heated rollers automatically laminate B Film (clear transfer sheet) over the printed A Film without trapping air bubbles.
Step 4: Trimming & Cutting
Use scissors or a cutter to separate individual stickers. Leave a 2–3 mm margin around the design edges to prevent peel-off during application.
Step 5: Surface Preparation
Clean the target surface (glass, plastic, acrylic, or metal) with isopropyl alcohol to remove dust, grease, and finger oils for maximum adhesive bonding.
Step 6: Peel, Position & Press
Peel off the bottom A Film—the print stays on the clear B Film. Align the transfer on your target surface, then press firmly with a squeegee from the center outward.
Step 7: Final Peel & Finish
Slowly peel off the clear B Film at a 180-degree angle. Your 3D glossy, scratch-resistant sticker is now permanently applied!

🧠 Tips for Best Results
🌡️ Work in a clean area to avoid dust and bubbles.
🔍 Make sure the A and B films are lined up correctly.
🧴 Wipe your item clean before applying the sticker.
⏳ Don’t rush the UV curing—fully dried ink sticks better and lasts longer.
⚠️ Common Mistakes to Avoid
❌ Skipping the UV curing step—your sticker won’t stick.
❌ Using blurry or low-quality images—your print will look fuzzy.
❌ Not pressing firmly enough—can cause edges to lift later.
🏆 Why Choose Winnerjet for UV DTF Printing?
Whether you’re just getting started or growing your custom printing business, Winnerjet has the complete UV DTF solution to help you succeed:
-
🖨️ UV DTF Printer — Stable output, high precision, supports CMYK + White + Varnish in one pass
-
💧 UV DTF Ink — Fast-curing, vivid colors, strong adhesion on glass, plastic, metal, and more
-
🎞️ UV DTF A Film & B Film — Anti-static coating, clean release, perfect layering with no smudges
📦 Want to try before you buy?
👉 Contact us to request a free sample, get bulk pricing, or speak with our UV DTF experts.
💬 FAQs
Can I make UV DTF transfers at home without a UV printer?
Yes! You don’t need to purchase a UV printer to create transfers at home. You can order custom pre-printed UV DTF transfer sheets from a supplier, then cut, peel, and apply them using just a squeegee and scissors.
What materials and surfaces can UV DTF transfers stick to?
UV DTF stickers stick to almost any hard, smooth, or curved surface, including glass, ceramic mugs, stainless steel tumblers, acrylic, hard plastics, metal, wood, and leather. No heat press is required.
Do UV DTF transfers require a heat press or laminator?
No heat press is needed. Modern UV DTF printers automatically laminate A and B films with heated rollers during printing. If you print manually, a simple manual cold/warm laminator or squeegee will combine the A and B films easily.
How long do UV DTF transfers last, and are they waterproof?
Once fully cured on the substrate (allow 24 hours for maximum adhesion), UV DTF transfers are waterproof, scratch-resistant, and UV-resistant. They can withstand daily hand washing and long-term outdoor exposure.
What is the difference between UV DTF A Film and B Film?
A Film is the printable base film coated with a pressure-sensitive adhesive layer where ink and varnish are deposited. B Film is the clear transfer positioning film used to pick up the printed image from Film A and apply it to your final object.