What is the best way to dry DTG inks for Epson printers? The absolute best way to “dry” Epson DTG inks is to heat-cure them using a commercial heat press with the “hover” method, followed by a full-pressure press.
If you are wondering how to simply “dry” DTG ink as a beginner, it is crucial to understand that water-based pigment inks for Epson printheads cannot be cured by air-drying. Instead, they must undergo a chemical reaction called curing—a process thoroughly documented in digital textile studies by Ink World Magazine. To achieve maximum wash fastness and prevent your prints from cracking or fading, you must cure the ink at 320°F (160°C) for 90 seconds.
In this guide, we will break down the step-by-step techniques for both heat presses and conveyor dryers to help you achieve retail-quality, long-lasting prints.
Why “Drying” is Not “Curing” for Epson DTG Inks
In the direct-to-garment (DTG) printing industry, “Drying” and “Curing” are two entirely different concepts. Confusing these two is the primary reason why printed garments fade or peel during their very first wash.
1. The Physical Properties of Epson DTG Inks (Water-Based Pigment Inks)
High-quality DTG inks compatible with Epson printheads consist of three core components:
Water & Co-solvents: Make up the bulk of the ink volume, acting as the carrier to transport and deliver the color pigments smoothly through Epson’s micro-piezoelectric printheads.
Nano-pigments: Ultra-fine color particles that provide the actual image color and vibrancy.
Liquid Resin Binders: The “glue” of the ink formula, responsible for binding the pigments to the garment fibers during the post-printing stage.
2. Why Simply “Air Drying” Does Not Work
Natural air drying or using a hairdryer on a cool setting only completes a basic physical process: water evaporation.
❌ The Consequences of Air Drying: While the water disappears, the resin binders are never chemically activated. The pigments are left loosely “piled” on the surface of the fabric fibers. Once washed, water molecules will instantly flush away these loose particles, causing the print to completely flake off and fade.
3. Why You Must Lock in Colors Through Curing
To achieve retail-grade wash fastness, you must use heat and time to trigger a thermal cross-linking chemical reaction:
- Resin Activation: When the temperature reaches 320°F (160°C), the resins melt and tightly encapsulate the nano-pigments.
- Network Anchoring: Sustained heat forces the resin molecules to bond with one another, forming a tough, three-dimensional mesh network that grips the cotton fibers tightly.
In short: Drying simply removes the water, while curing chemically “locks” the resin into the fibers. Only complete thermal curing will allow your Epson DTG prints to withstand dozens of stretch and machine wash cycles.
When Can or Must You “Dry” Epson DTG Inks?
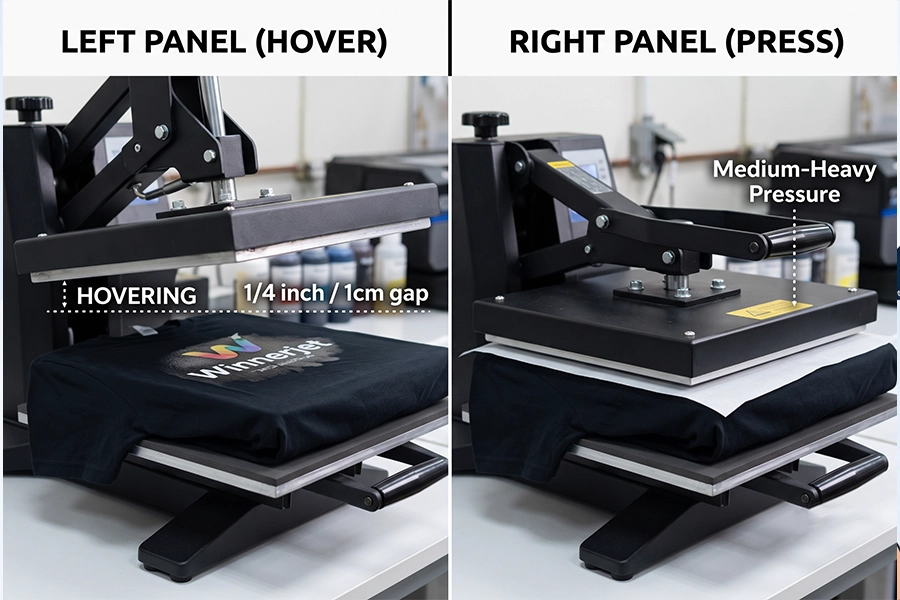
In a practical DTG (Direct-to-Garment) production workflow, “Drying” is not a substitute for curing, but rather the essential bridge that leads to a successful “Curing” process.
| Production Scenario | Why Do You Need to "Dry" First? | How to Execute (Operational Steps) |
|---|---|---|
|
1. The Hovering Stage (For Heat Press Curing) |
Directly pressing wet ink—especially heavy white ink on dark garments—causes colors to bleed, ruins print details, and sticks to the heat platen. | Suspend the heating platen about 1 cm (1/4 inch) above the garment (no physical contact) and hover-bake for 15–30 seconds to dry and skin the ink surface. |
|
2. Conveyor Dryer Setup (For High-Volume Production) |
Ideal for medium-to-large print shops looking to bypass the stiff, vinyl-like feel caused by a heat press's physical weight, preserving the fabric's natural softness. | Garments travel slowly through a high-temperature tunnel set to 320°F–340°F (160°C–170°C). The first half dries the water, and the second half cures the resins. |
|
3. Flash Drying (For Multi-Layer Printing) |
Prevents the printhead or newly jetted layers from smudging, dragging, or blending with wet underbase inks during multi-layer printing or specialty effect stacking. | Use a flash dryer or an industrial heat gun to quickly dry the surface of the targeted wet ink zones until they lose their fluidity. |
⚠️ Winnerjet Tech Tip: Regardless of which scenario above you use to “dry” your prints, keep in mind that drying is only an intermediate transition step. For the resins in Epson DTG inks to bind effectively to the cotton fibers, they must undergo high-temperature thermal cross-linking (curing). If you only dry the ink without curing it, the print will inevitably peel and fade as soon as it hits the washing
Why Curing is Crucial for Epson DTG Printers
If you are operating a converted Epson printer (such as an L1800 or XP600 conversion setup) or a commercial-grade DTG machine like the Epson SureColor F2100, curing is the ultimate step that determines the success or failure of your prints.
In direct-to-garment printing, completing the print only achieves the “visual presentation.” It is the curing process that permanently “locks” this artwork into the fabric’s fibers.
4 Fatal Consequences of Improper Curing
If your curing temperature is uneven, the duration is insufficient, or the applied pressure is incorrect, your products will inevitably face these disastrous post-press issues:
- Print Cracking: When the ink’s resins fail to cross-link fully into a highly elastic, three-dimensional protective mesh, even a slight stretch of the fabric will cause the print to crack like parched clay.
- Severe Color Fading After Washing: When the nano-pigments are not securely locked inside the fabric fibers, they will easily wash away during the very first laundry cycle, turning once-vibrant, high-saturation colors dull and washed out.
- Rough & Stiff Hand Feel: Uncured ink piles up on the fabric surface rather than fusing with the individual fibers, leaving the print feeling like a stiff, plasticky sheet that ruins the comfort of the garment.
- Excessive Garment Shrinkage: Failing to control the moisture evaporation rate of the fabric during the curing stage can cause severe garment distortion, warping, and shrinkage after heat pressing.
📌 Tip: To achieve professional-grade wash fastness and vibrant colors, setting up a standardized curing workflow is non-negotiable. For a deeper dive into the chemistry and complete operational checklists, check out our comprehensive guide on How to Cure DTG Ink.
Temp & Time for Epson DTG Ink Curing
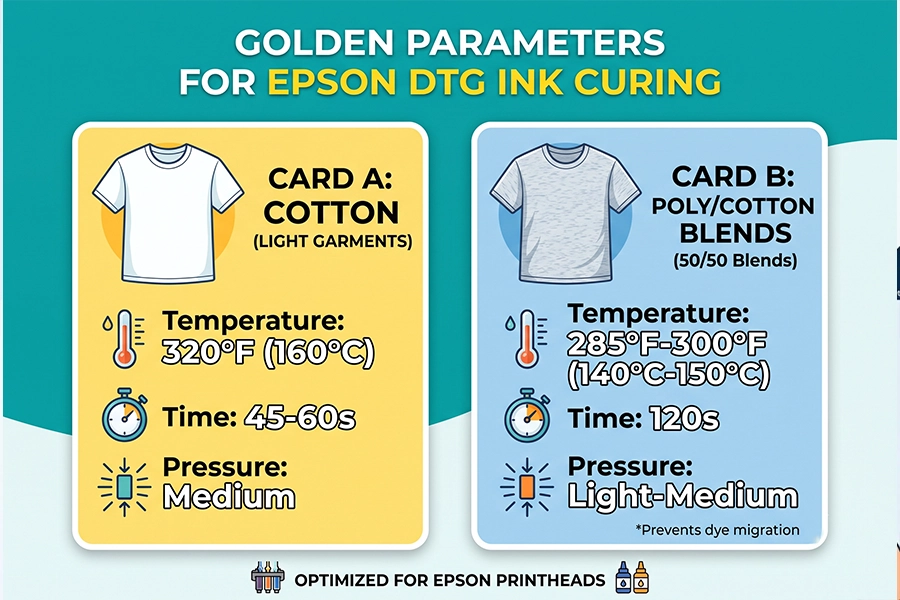
To achieve flawless wash fastness in production, you must strictly control three core elements: temperature, time, and pressure. Below is a quick-reference golden curing parameter table specifically optimized for Epson DTG inks:
1. Recommended Curing Parameters
| Fabric & Print Type | Heat Press Method | Conveyor Dryer Method |
|---|---|---|
|
Light Garments (CMYK Ink Only / No White Underbase) |
320°F - 330°F (160°C - 165°C) Press continuously for 45 - 60 seconds under medium pressure. |
320°F - 340°F (160°C - 170°C) Dwell time inside the tunnel: 2 - 2.5 minutes. |
|
Dark Garments (White Ink + CMYK) |
320°F (160°C) 90 seconds total (30-second hover first + 60-second closed press). |
320°F - 340°F (160°C - 170°C) Dwell time inside the tunnel: 3 minutes (slow down the belt speed). |
❗ Tips: Before printing, ensure the pretreatment liquid is 100% thoroughly dry; you can use a heat press to lightly press the garment for 5–10 seconds to remove moisture until it feels completely dry to the touch. Always place a protective sheet over the design during heat pressing. Use parchment paper if you prefer a soft, matte finish, or a Teflon sheet if you prefer a slight glossy sheen.
2. Dynamic Tweaks: What If You’re Printing on Polyester Blends?
While the standard “320°F (160°C) for 90 seconds” curing rule works beautifully for 100% cotton, you must adjust your parameters when printing on 50/50 polyester blends:
- The Adjustments: Lower your heat press temperature to 285°F – 300°F (140°C – 150°C) and extend the press duration to 120 seconds.
- The Reason: This delicate balance ensures that the ink’s binding resins safely undergo thermal cross-linking without getting hot enough to trigger dye migration (which causes synthetic garment dyes to bleed into and discolor your white ink prints).
Can You Mix Different Brands of DTG Inks and Cure Them Together?
In practical workshop environments, many operators try to mix different brands of DTG inks to save on costs or handle an emergency shortage. However, our specialized R&D team issues the most serious warning: Never mix different brands of DTG inks, even if they are all designed for Epson printheads!
1. Two Disastrous Consequences of Mixing DTG Inks
Chemical Incompatibility ➡️ Permanent Printhead Clogging: Different brands—such as high-end Winnerjet DTG inks versus cheap third-party consumables—utilize vastly different acrylic or polyurethane resin formulations, pH values, and surface tensions. Mixing them breaks their delicate chemical stability instantly, causing nano-pigments to quickly coagulate and precipitate. This will permanently block Epson micro-piezoelectric printhead nozzles.
Incomplete Curing ➡️ Wash Fastness Failure: The active resins in different inks have unique activation temperatures and duration thresholds for thermal cross-linking. A mixed ink solution cannot achieve 100% proper cross-linking under a single heat-setting standard, causing the print to flake off, peel, or fade severely after laundry cycles.
2. Choose a Stable & High-Compatibility Epson DTG Ink Solution
Instead of wasting your valuable time, printhead lifespan, and customer trust on frequent mixing experiments and printhead cleanings, opt for a highly compatible and incredibly stable, unified ink solution.
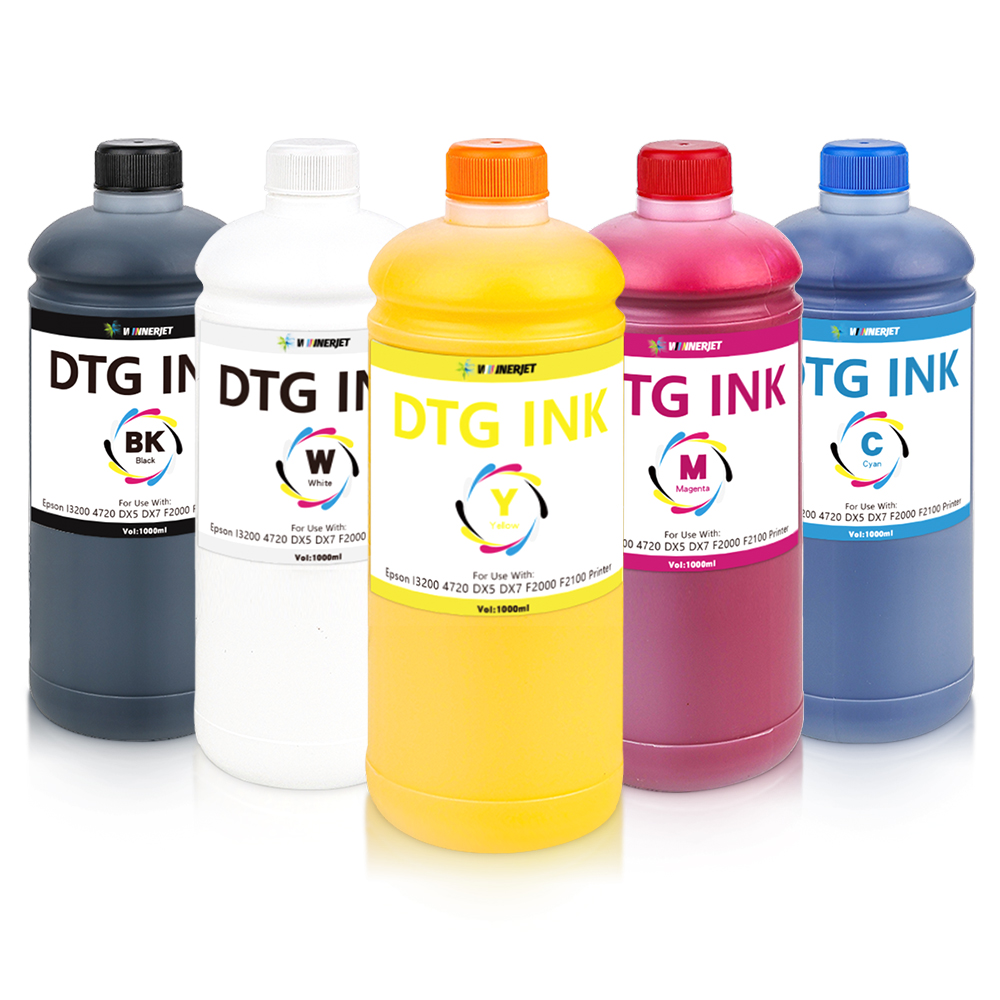
As a Chinese manufacturing brand with nearly 20 years of experience in digital inkjet printing and consumables manufacturing, Winnerjet has engineered a complete line of premium DTG pigment inks specifically optimized for Epson printheads. Leveraging our extensive cross-border trade experience, we ship directly from our factory to provide fast, reliable direct shipping and a stable global supply.
📞 Want to receive free professional curing parameter recommendations or customize a stable Epson DTG ink setup for your business?
We welcome you to contact our technical support experts directly via WhatsApp or Email to get real-time assistance and solutions!
3 Reasons Why Your Epson DTG Prints Still Fade After Curing
If you have strictly followed the recommended time and temperature settings but your prints still fade, crack, or peel after washing, do not panic. In digital direct-to-garment (DTG) production, several hidden operational variables can quietly ruin your curing results.
Below are the 3 most common reasons why Epson DTG prints fail to cure properly, along with their ultimate troubleshooting solutions:
Reason 1: Uneven Platen Temperature
Many low-to-mid-range heat presses on the market suffer from unevenly distributed heating elements or aging components. Your control panel might display a perfect 320°F (160°C), but the actual temperature at the edges or specific zones of the heating platen might only be 280°F (140°C). This temperature drop prevents the ink’s resins in those areas from fully activating, leading to localized fading.
The Solution: Use an infrared thermometer (laser temperature gun) to test multiple spots across the platen—specifically the center, edges, and all four corners—while the heat press is heating up. If you detect a temperature difference of more than 10°F (5°C), you should upgrade to a high-quality commercial heat press or avoid placing your graphics on those weaker heating zones.
Reason 2: Pretreatment is Not 100% Dry Before Printing
Pretreatment is critical for white ink underbasing and color locking. If the jetted pretreatment solution is not 100% dry before printing begins, the remaining moisture and acidic compounds will chemically mix with the freshly jetted wet ink. This directly disrupts the cross-linking structure of the ink’s base resin layer, making it impossible for the ink to bond firmly with the fabric fibers, even during post-printing heat pressing.
The Solution: The garment must feel completely dry to the touch before printing. After spraying your pretreatment, use a heat press to lightly press the garment for 5 to 10 seconds to ensure all moisture inside and on the surface of the fibers has completely evaporated.
Reason 3: Insufficient Pressure Applied
The three pillars of curing are temperature, time, and pressure. Many operators focus solely on the first two and ignore pressure. If your heat press pressure is set too light, tiny gaps remain between the heating platen and the ink layer, preventing heat from quickly penetrating down to the resins at the bottom of the ink. If the base resins do not melt, the entire print becomes an unstable structure that easily washes away.
The Solution: Always apply a stable, medium-to-heavy physical pressure during curing to force the heat platen to press and penetrate the heat deep into the garment fibers.
💡 What If You Have Checked All 3 Steps and the Print Still Fades?
If your temperature is accurate, your pretreatment is completely dry, your pressure is sufficient, and the print still washes off, this usually indicates that you are using low-quality, cheap third-party ink. Without a high concentration of premium resin binders, even perfect curing techniques cannot save a substandard ink formula.
🔍 How to Verify Your Cure is Complete (Before Washing)
Do not wait for your customer to wash the shirt to find out if your curing failed. Use these two professional, zero-cost tests immediately after your production run:
The Stretch Test: Once the cured garment has completely cooled down, gently stretch the printed area with both hands. If the print stretches with the fabric and snaps back into place without cracking, the resins have successfully achieved cross-linking. If micro-cracks appear, it indicates that your curing temperature or pressure was too low.
The 24-Hour Wash Rule:Never wash a freshly cured DTG print immediately. The chemical cross-linking process of water-based resins continues to stabilize and settle even after heat pressing is complete. Always wait at least 24 hours before performing any wash tests to ensure the protective ink layer is fully cured.
Master the Art of Curing for Long-Lasting Prints
In the direct-to-garment (DTG) printing industry, achieving a stunning print on your fabric is only half the battle. As we have explored, drying simply allows the moisture to evaporate, while standardized, high-temperature curing is the absolute best way to fuse the ink perfectly with the garment fibers.
As a digital printing consumables brand with nearly 20 years of manufacturing experience, Winnerjet has engineered a complete line of premium, clog-free, and highly wash-fast DTG pigment inks tailored specifically for Epson printheads. We are ready to provide you with a free technical diagnosis for your curing workflow and send you high-quality Winnerjet DTG ink samples for testing!
FAQs: Common Questions About Curing Epson DTG Prints
Can I use a household hand iron to cure DTG prints?
No, household irons are highly discouraged for commercial DTG curing. Achieving retail-grade wash fastness requires consistent, heavy pressure and an exact, uniform temperature of 320°F (160°C). Household hand irons have uneven heating elements and cannot apply sustained, stable physical pressure. This inevitably leads to localized cold spots, resulting in severe print cracking and washing washouts.
Should I wait to wash the printed garment after curing?
Yes, you must wait at least 24 hours before the first wash. Even after heat pressing is complete, the chemical cross-linking process of water-based resins continues to stabilize and settle. Washing the garment immediately will disrupt this chemical bonding, stripping away the protective ink layer and causing premature fading.
s parchment paper reusable for heat pressing?
Yes, parchment paper can typically be reused 5 to 10 times. However, you must inspect it between presses. Once the paper begins to turn yellow, scorch, or pick up any ghosting ink residue from previous garments, replace it immediately to prevent transferring stains to your next print.