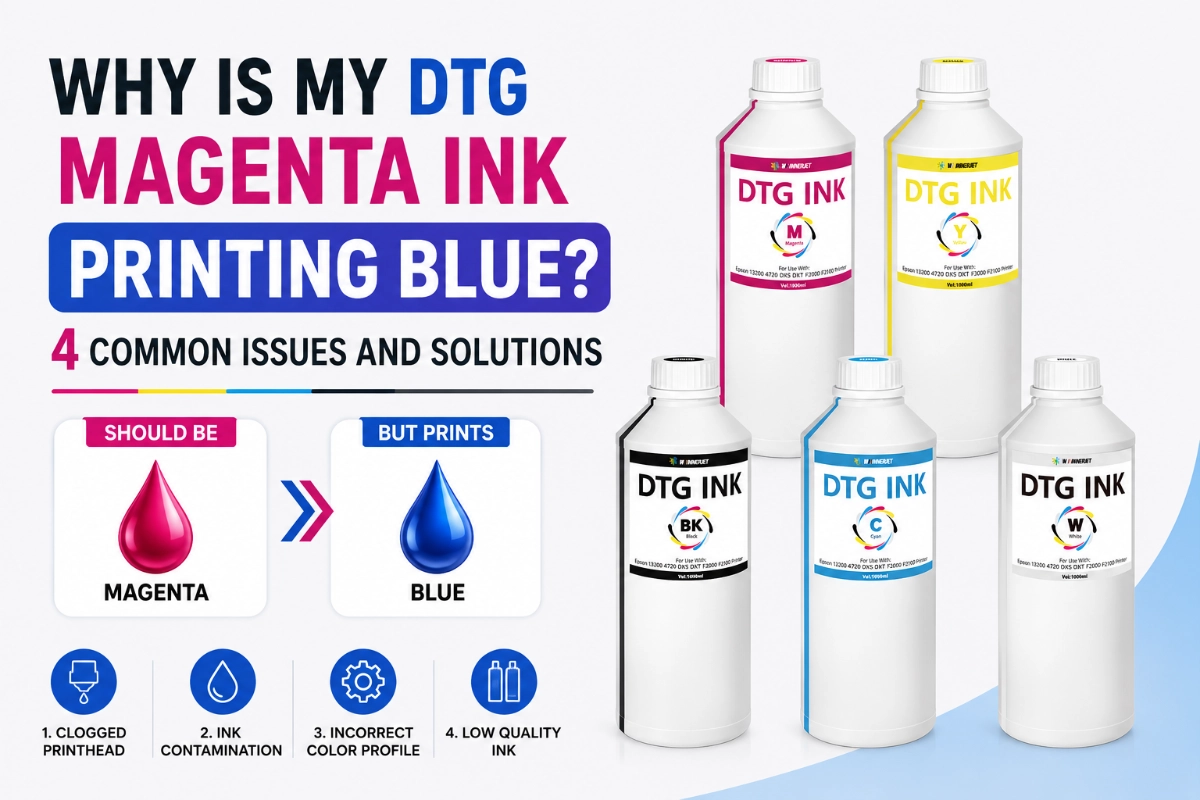
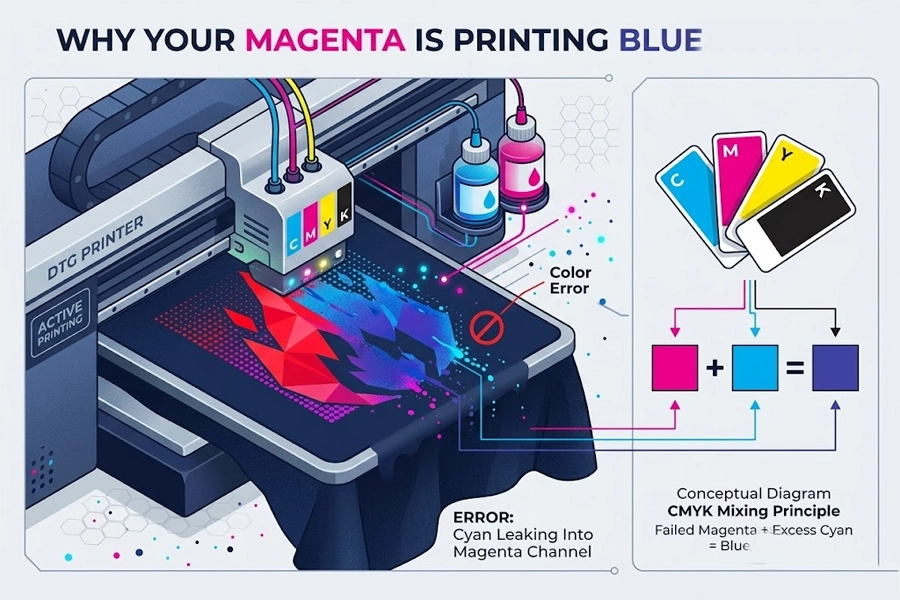
If your DTG printer is printing Magenta erroneously as blue, please hit the pause button immediately!
Continuing to print blindly will not only ruin more garments but also cause secondary calibration waste of expensive DTG ink. This phenomenon is highly typical in the direct-to-garment printing industry, and its technical essence is usually that Cyan ink has physically contaminated the neighboring Magenta channel. To help you recover from losses, we have summarized 4 core hardware and software vulnerabilities beyond surface contamination. By following the standard troubleshooting workflow below, with just 4 simple steps and a maximum of 15 minutes, you can resolve the malfunction on your own, letting the color return to pure perfection! Save ink!
🎨 4 Common Root Causes Behind Magenta Turning Blue
In the CMYK color model, purple/blue is typically a blend of Magenta + Cyan. If an area that only requires Magenta turns blue, it generally indicates that Cyan ink has contaminated the Magenta channel.
The most common culprits include:
- Cause 1: Printhead Cross-Contamination / Color Bleeding
This is the most frequent cause. Accumulations of ink, lint, or debris may settle on the printhead surface, causing Cyan ink to “wick” or travel across the printhead surface into the Magenta nozzles. When the printer intends to fire Magenta, it actually ejects ink mixed with Cyan, resulting in blue.
- Cause 2: Dirty Wiper Blade or Cap Top
Too much waste ink has accumulated on the maintenance assemblies (Wiper or Capping Station). During automatic head cleanings, the wiper fails to clean properly and instead smears Cyan waste ink directly onto the Magenta nozzles.
- Cause 3: Incorrect Cartridge/Damper Installation
Though it sounds rudimentary, beginners occasionally reverse the physical lines for Cyan and Magenta when setting up a bulk ink system or replacing dampers, or they mistakenly fill the wrong ink tank.
- Cause 4: Corrupted Software ICC Profile
If you confirm that the hardware is perfectly fine, then the color management within your computer’s RIP (printing output) software is malfunctioning, erroneously identifying red signals as blue outputs.
⚡ The 15-Minute Quick Fix: 3 Steps to Diagnose and Recover
⚠️ Please immediately halt your current batch printing jobs! Continuing to print blindly at this time will only waste more expensive garments and ink. Please follow these 3 simple steps, which usually take just 15 minutes, to completely purge the Cyan ink mixed into the Magenta channel and restore pure color output.
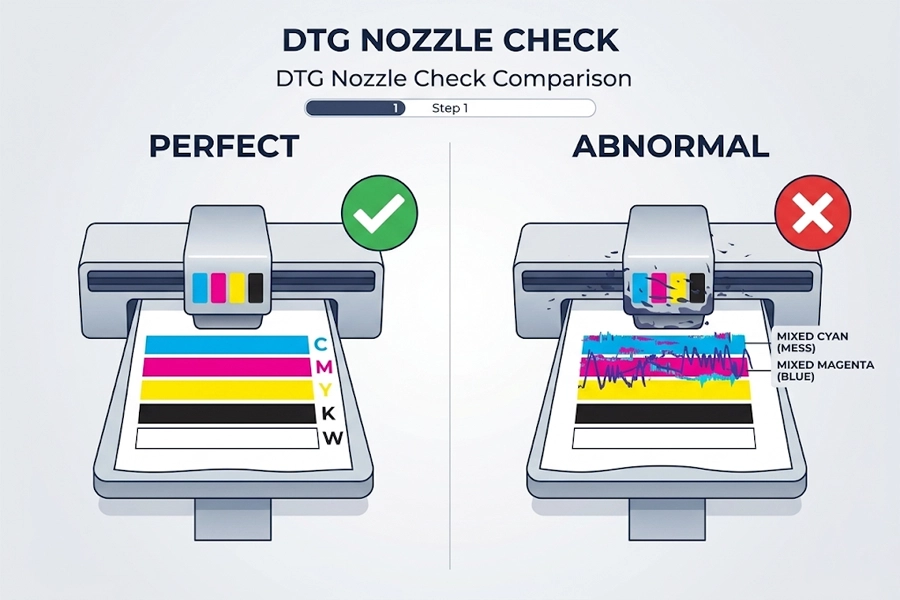
1. Step 1: Run a Nozzle Check
Do not print complex graphics directly. Please select and execute the “Nozzle Check” diagnostic routine in your RIP software or via the printer’s control panel to print parallel test lines across all CMYK channels on a piece of test paper or a scrap light-colored fabric.
What to look for: Carefully examine the Magenta zone on the test pattern.
- Normal Status: The Magenta lines are crisp, continuous with no missing nozzles, and the color is completely pure.
- Abnormal Status (Cross-Contamination): The Magenta test lines are visibly laced with distinct Cyan horizontal lines or color patches, confirming that Cyan ink is physically contaminating the Magenta channel.
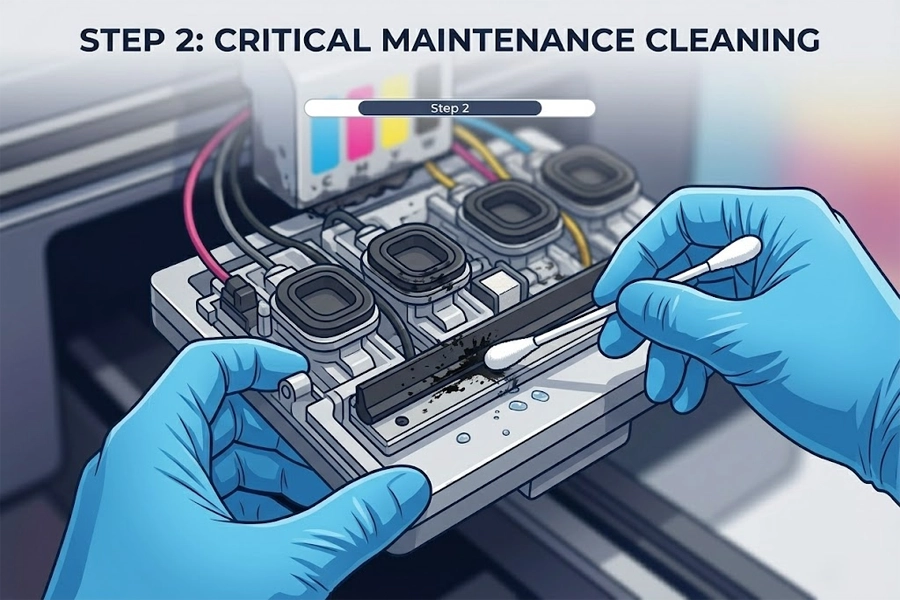
2. Step 2: Clean Critical Maintenance Components
In DTG printing, up to 90% of physical cross-contamination stems from maintenance assemblies. When an automatic cycle finishes, if the wiper blade or cap top is overly dirty, the accumulated waste ink fails to be cleared and is instead smeared back and absorbed onto the printhead surface.
Step-by-Step Guide:
- Return the carriage block to its home position or move it to the maintenance area, then completely turn off the printer’s power.
- Prepare several industrial-grade, lint-free cleaning swabs and dampen them with a proper amount of dedicated DTG cleaning solution.
- Wipe the Wiper: Wipe carefully along the same direction on both sides of the wiper blade lip to remove crusty ink deposits and trapped lint fabric. If the wiper blade is heavily warped or hardened, replace it immediately.
- Clean the Cap Top: Focus the swab on clearing out sludge along the rubber gaskets around the rim of the cap top/capping station, ensuring the surface is smooth and free of debris so it can form a flawless airtight seal with the printhead later.
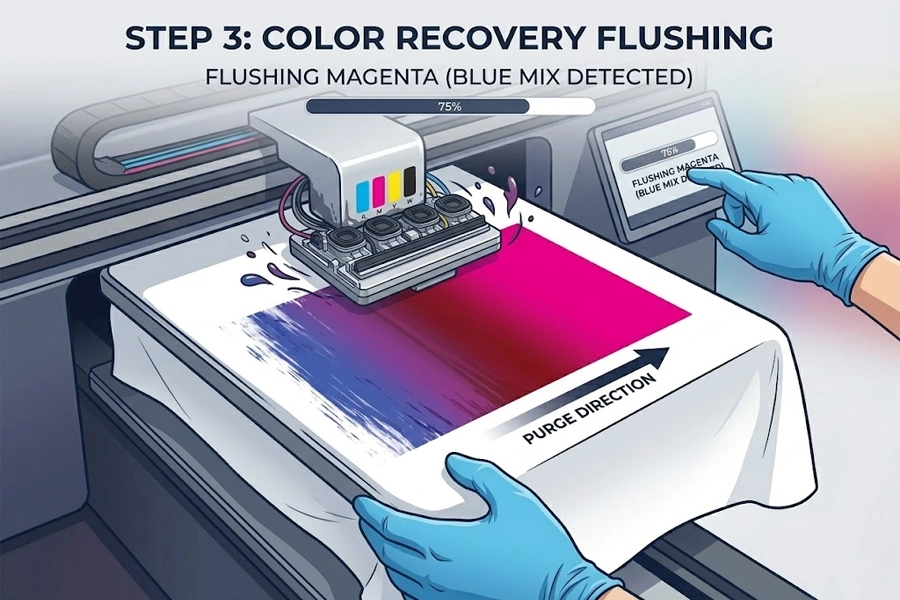
3. Step 3: Run Head Cleaning & Flush Color Blocks
Once physical cleaning is complete, power the machine back on. Run 1 to 2 regular “Head Cleaning” cycles from the system panel to leverage the printer’s built-in pump assembly, drawing away any remaining blended waste ink on the nozzle surface.
Advanced Technique (Color Block Purge Method): If the output still shows a slight blue tint after regular cleaning, do not run consecutive deep cleanings (which can easily degrade printhead lifespan).
- Open your RIP software and create a standard rectangular canvas.
- Set the color fill values to Pure Magenta (C:0%, M:100%, Y:0%, K:0%).
- Print this pure magenta block directly onto scrap fabric or test paper.
- During continuous firing, the high-frequency vibration of the Magenta ink stream acts as a “natural flushing agent,” forcing out any microscopic traces of Cyan ink trapped within the nozzles and dampers. Typically, after printing 1 or 2 color blocks, you will see the output color visibly transition from blue-purple back to a brilliant, pure magenta.
🔍 Deep-Dive Troubleshooting
If the 15-minute quick fix ends in failure, please stop repeating head cleanings, because the problem now most likely points to aging seals, internal air leaks, or color management software (RIP) issues. Continuing to clean blindly will only cause unnecessary wear on your printhead.
Next, we will open up “surgery mode.” Below are the 4 underlying hardware and software causes keeping your Magenta printing blue. Audit your equipment state against them to diagnose and fix the root issues:
1. Check Printhead Surface Cross-Contamination & Physical Debris
This is the most common cause. The printhead surface can gather ink pooling, dried ink crust, or fabric lint and textile dust flying off pure cotton garments during printing. This debris acts like a “microscopic bridge,” allowing Cyan ink to creep along the printhead face and into the Magenta nozzle holes, causing physical cross-contamination (color bleeding).
As many print production operators discuss in Facebook printer communities, when this surface contamination gets severe, users even post inquiries like: “Why is blue or black going into my magenta’s?” This is precisely a full-scale multi-channel contamination caused by migrating debris across the head.
Method (The Fix):
- Completely shut down the printer power.
- Take a lint-free swab dampened with a little dedicated DTG cleaning solution.
- Extremely gently wipe down the metal frame surrounding the perimeter of the printhead, clearing out gathered lint and ink crust. (Crucial Note: Never use the swab to scrub or scrape forcefully across the actual nozzle face of the printhead!)
2. Audit the Wiper Blade & Cap Top Maintenance Assembly
Too much waste ink has piled up on the automatic maintenance module (wiper or capping station). When the printer runs an automatic cleaning cycle, a wiper blade that is too dirty or already warped fails to scrape clean, dragging a whole smear of Cyan waste ink across into the Magenta nozzles.
Within the T-Shirt Forums community, users have run into bizarre issues where “White ink is coming out Blue” (white prints showing blue borders or a blue tint). This is usually the wiper sweeping across with Cyan waste ink, contaminating otherwise isolated white or alternate color channels. A veteran user pointed out: “Sometimes if your wiper blade is dirty your gaskets aren’t fully clean…” Feedback from this user after finally resolving the issue revealed that channels desperately sucking in neighboring Cyan ink can be triggered by low ink cartridges, alongside an uncleaned wiper. When a cartridge runs near empty, air easily slips into the supply lines. This sudden air bubble shatters the internal pressure balance of the printhead, forcing neighboring ink channels (like Cyan) to be sucked back into the starved channel during cleaning or resting states.
Method (The Fix):
- Thorough Physical Cleaning: Wipe down the wiper blade cleanly with cleaning solution, checking the rubber for signs of aging, jagged wear, or warping. If warped, you must install a new wiper blade.
- Airtight Gasket Inspection: Clean the rubber gaskets sealing the edge of the cap top to ensure it can seat perfectly flush with the printhead. If waste ink build-up is severe, it is highly recommended to replace the entire capping station.
- Check Ink Levels & Run System Flush: Never let your ink cartridges sit at low ink levels for extended periods! Verify all ink colors are topped off. If lines have sucked in air, use dedicated cleaning solution to run a comprehensive system flush through the ink lines, forcing out the air bubbles until fluid pressure and color return to normal.
3. Check Dampers, Negative Pressure Systems & Hardware Integrity
Though simple, beginners sometimes cross the physical tubing lines for C, M, Y, K, W or fill the wrong ink reservoirs when setting up a bulk ink system or installing replacement dampers. Additionally, when the printer sits idle, if a damper is aging, cracked, or an O-ring seal is loose and drawing air, the internal negative pressure equilibrium breaks, allowing Cyan ink to back-siphon and bleed into the Magenta channel.
Based on case feedback from Reddit printer community users, if you confirm the ink is loaded correctly and color mixing persists heavily even after flushing, you must watch out for a cracked manifold. If the plastic manifold on top of the printhead develops microscopic cracks in its internal chamber walls, ink channels will directly bridge and contaminate each other internally.
Method (The Fix):
- Trace your ink lines physically to ensure the paths for C, M, Y, K, W correspond perfectly between the cartridges and the printhead inputs.
- Check the Magenta damper for excessive air pockets and look for signs of ink weeping around the manifold connections. If you spot cracked hardware or degraded dampers, replace the corresponding parts immediately.
4. Troubleshoot RIP Software & ICC Profile Issues
If you run a nozzle check after inspecting steps 1, 2, and 3 without finding any issues—meaning the test lines for Magenta are completely pure and devoid of Cyan lines (proving the hardware is functionally healthy with no physical color bleed)—yet the printer stubbornly fires blue whenever a red graphic is processed, the culprit sits inside your computer. Your RIP software (printing output software) color management channel mapping has glitched, or the ICC profile has become corrupted or broken, causing the software to misinterpret a red input signal and send a blue firing instruction instead.
Method (The Fix):
- Check the channel mapping setup inside your RIP software to ensure output ports haven’t been altered accidentally.
- Try resetting your RIP software back to factory defaults or re-importing the official manufacturer ICC profile mapped to your machine model and ink set.
- Print a basic pure test graphic (100% Magenta) first to verify if the digital color signal has stabilized on the software side.

🧽 How to Avoid Future Color Mixing and Stop Wasting Expensive DTG Ink
A severe cross-contamination incident does more than ruin a premium custom garment; repetitive deep cleanings drain an immense volume of expensive DTG ink for no productive return. To keep your equipment performing at its absolute peak, build these three industry-standard maintenance habits into your daily shop workflow:
Maintain Daily Wet Capping: When your DTG printer sits idle, on standby, or turned off, the printhead must never remain exposed to open air. If the printhead carriage fails to dock perfectly, residual ink can dry out and crust over microscopic nozzle paths within minutes, triggering severe siphoning and cross-contamination across channels during the next startup sequence. Always ensure the carriage docks flawlessly against the cap top for an airtight seal.
Replace Consumables on a Routine Schedule: Establish a timeline to swap out wiper blades and cap tops every 3 to 6 months.
Control the Production Environment: Maintain a steady workshop temperature between 20°C – 25°C (68°F – 77°F) and a relative humidity strictly bounded between 40% – 60% (utilize industrial humidifiers or dehumidifiers as needed) to prevent ink misting.
Tired of paying for wasted ink and expensive printhead repairs? Prevention is always cheaper than a cure! Remember, never purchase low-quality inks!
Visit our DTG Core Consumables Store. We provide factory-standard, long-life rubber wiper blades, high-density capping station assemblies, and industrial-grade maintenance supplies to ensure your direct-to-garment business maintains high-efficiency output every single day!
❓ FAQ DTG Printing
Why is my DTG printer printing purple instead of red/magenta?
This happens because Cyan ink has physically contaminated your Magenta channel, causing the colors to mix. It can also be caused by a corrupted ICC profile in your RIP software misinterpreting color signals.
Can a dirty capping station cause DTG ink cross-contamination?
Yes. If waste ink pools on the rubber gasket or inside the capping station sponge, it touches the nozzle face when docked. This draws neighboring colors into the magenta nozzles through capillary action.
How do I remove Cyan ink that has leaked into my Magenta ink lines?
Clean the wiper and cap top first. Then, open your RIP software and print a large color block set to 100% Magenta (C:0, M:100, Y:0, K:0) on scrap fabric to naturally flush out the trapped Cyan ink.
Why is my DTG white ink coming out with a blue tint?
This is typically caused by a filthy or warped wiper blade. During automatic cleaning, the wiper drags Cyan waste ink directly across the independent white ink nozzles, contaminating them.
Can a dirty capping station cause DTG ink cross-contamination?
Yes. When a cartridge is nearly empty, air bubbles enter the lines, breaking the internal negative pressure balance. This causes the starved channel to back-siphon ink from neighboring active channels.